Pembahasan UKK Paket 2 TKJ 2023: Perbedaan antara revisi
(→Ether2) |
|||
| Baris 230: | Baris 230: | ||
== Ether2 == | == Ether2 == | ||
[[Berkas:018-ip-vlan-siswa.png|pus|jmpl|424x424px]] | |||
== Ether3 == | == Ether3 == | ||
[[Berkas:019-ip-vlan-guru.png|pus|jmpl|438x438px]] | |||
== Wireless == | == Wireless == | ||
Revisi per 18 Mei 2024 06.20
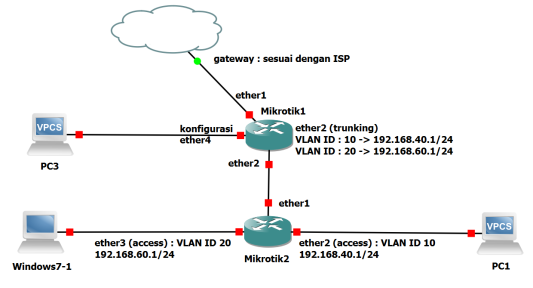
Topologi
Router 1
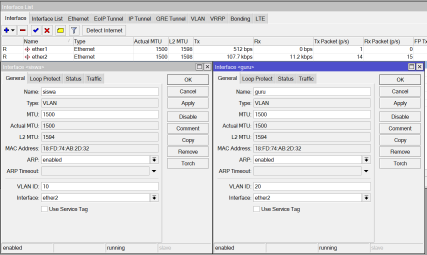
Interface VLAN
Tambahkan VLAN 1 dan VLAN 2
VLAN 1 Siswa dengan ID 10
VLAN 2 Guru dengan ID 20
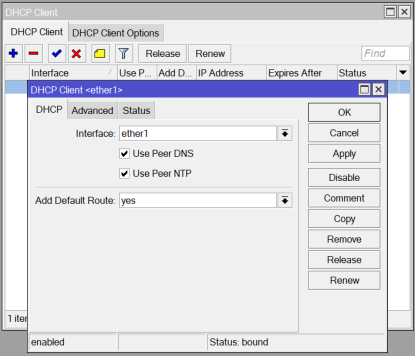
DHCP Client
Buka menu IP -> DHCP Client -> + -> interface pilih ether1, lalu klik OK
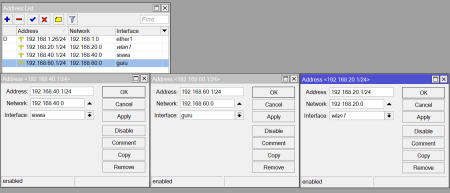
IP Address
Tambahkan IP Address
DHCP Server
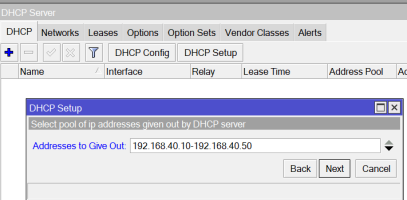
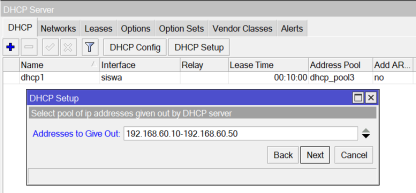
Tambahkan DHCP Server dengan mengklik DHCP Setup
Interface : siswa -> Next
Address to Give Out : 192.168.40.10 - 192.168.40.50 lalu Next sampai Succesfully
Interface : guru -> Next
Address to Give Out : 192.168.60.10 - 192.168.60.50 lalu Next sampai Succesfully
Firewall ->NAT
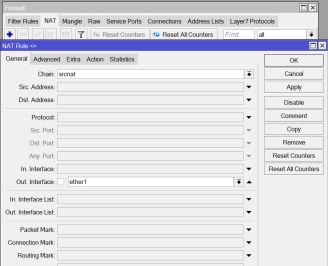
Buka menu IP -> Firewall -> Tab NAT -> +
Tab General :
Chain : srcnat
Out Interface : ether1
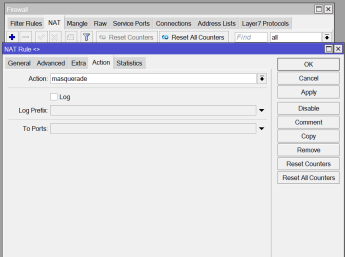
Tab Action :
Action : masquerade
Klik OK
IP -> Hotspot
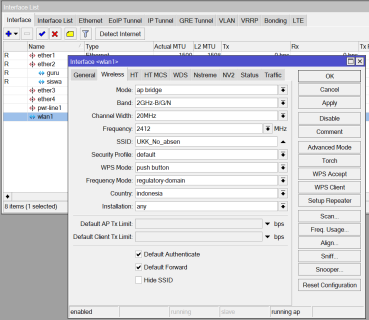
Buka Menu Interfaces, lalu aktifkan wlan1 dengan cara mengklik tombol ceklis (warna biru). Lalu klik 2x wlan1
Tab Wireless
Mode : ap bridge
Band : 2Ghz/B/G/N
SSID : UKK_no_absen
OK
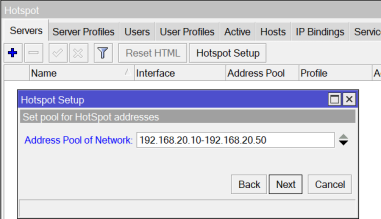
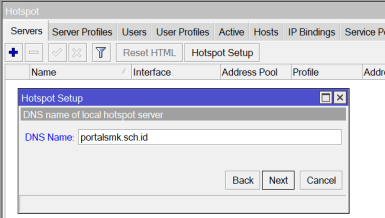
Buka IP -> Hotspot -> Hotspot Setup
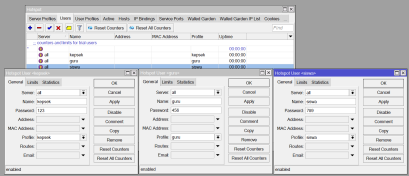
Membuat Username Password
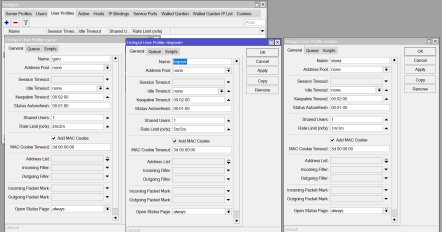
Membuat Profil Username
CLI hasil Konfigurasi Router 1
# may/18/2024 09:09:07 by RouterOS 6.48.6
# software id = 7BQN-24WM
#
# model = RB941-2nD
# serial number = HD5084GJDQD
/interface wireless
set [ find default-name=wlan1 ] band=2ghz-b/g/n disabled=no frequency=2472 \
    mode=ap-bridge ssid=UKK_no_absen
/interface vlan
add interface=ether2 name=guru vlan-id=20
add interface=ether2 name=siswa vlan-id=10
/interface wireless security-profiles
set [ find default=yes ] supplicant-identity=MikroTik
/ip hotspot profile
add dns-name=portalsmk.sch.id hotspot-address=192.168.20.1 name=hsprof1
/ip hotspot user profile
add name=kepsek rate-limit=5m/5m
add name=guru rate-limit=2m/2m
add name=siswa rate-limit=1m/1m
/ip pool
add name=dhcp_pool0 ranges=192.168.40.10-192.168.40.50
add name=dhcp_pool1 ranges=192.168.60.10-192.168.60.50
add name=hs-pool-6 ranges=192.168.20.10-192.168.20.50
/ip dhcp-server
add address-pool=dhcp_pool0 disabled=no interface=siswa name=dhcp1
add address-pool=dhcp_pool1 disabled=no interface=guru name=dhcp2
add address-pool=hs-pool-6 disabled=no interface=wlan1 lease-time=1h name=dhcp3
/ip hotspot
add address-pool=hs-pool-6 disabled=no interface=wlan1 name=hotspot1 profile=\
    hsprof1
/ip address
add address=192.168.40.1/24 interface=siswa network=192.168.40.0
add address=192.168.60.1/24 interface=guru network=192.168.60.0
add address=192.168.20.1/24 interface=wlan1 network=192.168.20.0
/ip dhcp-client
add disabled=no interface=ether1
/ip dhcp-server network
add address=192.168.20.0/24 comment="hotspot network" gateway=192.168.20.1
add address=192.168.40.0/24 gateway=192.168.40.1
add address=192.168.60.0/24 gateway=192.168.60.1
/ip firewall filter
add action=passthrough chain=unused-hs-chain comment="place hotspot rules here" \
    disabled=yes
/ip firewall nat
add action=passthrough chain=unused-hs-chain comment="place hotspot rules here" \
    disabled=yes
add action=masquerade chain=srcnat out-interface=ether1
add action=masquerade chain=srcnat comment="masquerade hotspot network" \
    src-address=192.168.20.0/24
/ip hotspot user
add disabled=yes name=kepalasekolah password=123 profile=kepsek
add name=siswa password=456 profile=siswa
add name=guru password=789 profile=guru
/system clock
set time-zone-name=Asia/Jakarta
/system identity
set name=RouterOS
Router 2
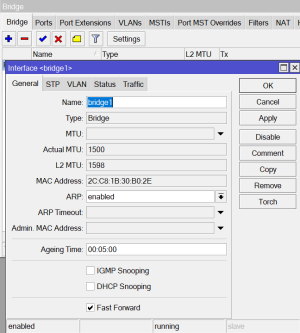
Bridge
Buka Menu Bridge, lalu buka
Tab Bridge -> +
Name : bridge1
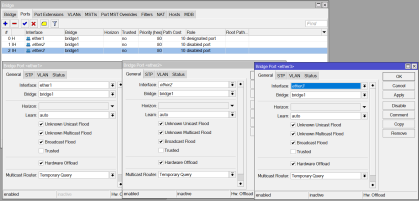
Tab Port -> +
masukkan
ether1
ether2
ether3
Switch
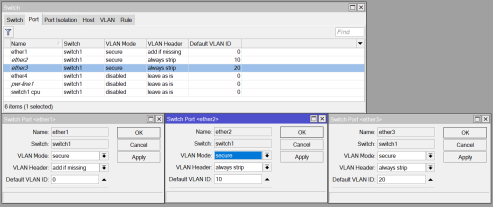
Buka Menu Switch
Tab Port
ether1 klik 2x, lalu rubah bagian berikut:
VLAN Mode : secure
VLAN Header : add if missing
ether2 klik 2x, lalu rubah bagian berikut:
VLAN Mode : secure
VLAN Header : always trip
Default VLAN ID : 10
ether3 klik 2x, lalu rubah bagian berikut:
VLAN Mode : secure
VLAN Header : always trip
Default VLAN ID : 20
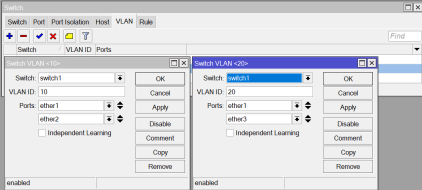
Tab VLAN -> +
VLAN ID : 10
Port : ether1 -> klik tombol panah kebawah
: ether2
OK
VLAN ID : 20
Port : ether1 -> klik tombol panah kebawah
: ether3
OK
CLI Hasil Konfigurasi Router 2
# jan/02/1970 01:43:47 by RouterOS 6.48.6
# software id = YHLA-V4X5
#
# model = RB941-2nD
# serial number = D1190EECECC4
/interface bridge
add name=bridge1
/interface wireless
set [ find default-name=wlan1 ] ssid=MikroTik
/interface ethernet switch port
set 0 vlan-header=add-if-missing vlan-mode=secure
set 1 default-vlan-id=10 vlan-header=always-strip vlan-mode=secure
set 2 default-vlan-id=20 vlan-header=always-strip vlan-mode=secure
/interface wireless security-profiles
set [ find default=yes ] supplicant-identity=MikroTik
/interface bridge port
add bridge=bridge1 interface=ether1
add bridge=bridge1 interface=ether2
add bridge=bridge1 interface=ether3
/interface ethernet switch vlan
add ports=ether1,ether2 switch=switch1 vlan-id=10
add ports=ether1,ether3 switch=switch1 vlan-id=20
/system identity
set name=RouterOS
