Install Roundcube Debian 12: Perbedaan antara revisi
Loncat ke navigasi
Loncat ke pencarian
k (Melindungi "Install Roundcube Debian 12" ([Sunting=Hanya untuk pengurus] (selamanya) [Pindahkan=Hanya untuk pengurus] (selamanya))) |
|||
| Baris 27: | Baris 27: | ||
== Langkah 1: Update Sistem == | == Langkah 1: Update Sistem == | ||
apt update | |||
apt upgrade -y | |||
== Langkah 2: Instalasi Paket Dasar == | == Langkah 2: Instalasi Paket Dasar == | ||
apt install -y postfix dovecot-core dovecot-imapd dovecot-pop3d \ | |||
apache2 mariadb-server php php-cli php-fpm php-json php-common \ | apache2 mariadb-server php php-cli php-fpm php-json php-common \ | ||
php-mysql php-zip php-gd php-mbstring php-curl php-xml php-pear \ | php-mysql php-zip php-gd php-mbstring php-curl php-xml php-pear \ | ||
| Baris 43: | Baris 41: | ||
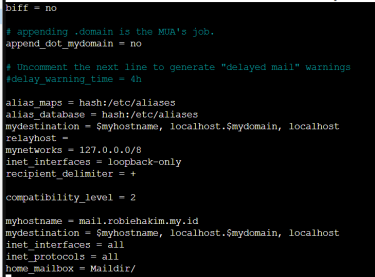
=== 1. Buka konfigurasi postfix === | === 1. Buka konfigurasi postfix === | ||
nano /etc/postfix/main.cf | |||
=== 2. Tambahkan/edit konfigurasi berikut: === | === 2. Tambahkan/edit konfigurasi berikut: === | ||
| Baris 56: | Baris 54: | ||
home_mailbox = Maildir/ | home_mailbox = Maildir/ | ||
[[Berkas:001-config-01.png|pus|jmpl|375x375px]] | |||
=== 3. Restart layanan postfix === | === 3. Restart layanan postfix === | ||
systemctl restart postfix | |||
== Langkah 4: Konfigurasi Dovecot == | == Langkah 4: Konfigurasi Dovecot == | ||
| Baris 65: | Baris 64: | ||
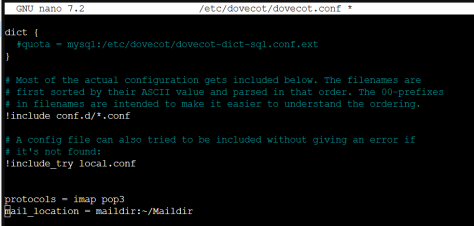
=== 1. Edit konfigurasi dovecot === | === 1. Edit konfigurasi dovecot === | ||
nano /etc/dovecot/dovecot.conf | |||
=== 2. Tambahkan/edit konfigurasi: === | === 2. Tambahkan/edit konfigurasi: === | ||
| Baris 72: | Baris 71: | ||
mail_location = maildir:~/Maildir | mail_location = maildir:~/Maildir | ||
[[Berkas:002-dovecot-conf.png|pus|jmpl|474x474px]] | |||
=== 3. Restart layanan dovecot === | === 3. Restart layanan dovecot === | ||
systemctl restart dovecot | |||
== Langkah 5: Instalasi Roundcube == | == Langkah 5: Instalasi Roundcube == | ||
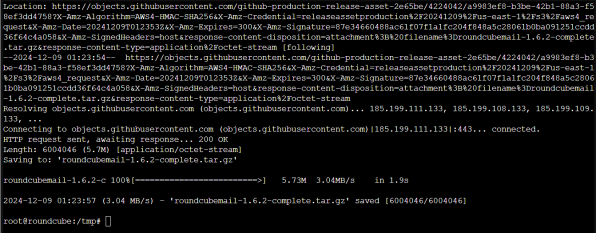
| Baris 84: | Baris 84: | ||
wget <nowiki>https://github.com/roundcube/roundcubemail/releases/download/1.6.2/roundcubemail-1.6.2-complete.tar.gz</nowiki> | wget <nowiki>https://github.com/roundcube/roundcubemail/releases/download/1.6.2/roundcubemail-1.6.2-complete.tar.gz</nowiki> | ||
tar -xvzf roundcubemail-1.6.2-complete.tar.gz | tar -xvzf roundcubemail-1.6.2-complete.tar.gz | ||
[[Berkas:003-proses-download-roundcube.png|pus|jmpl|596x596px]] | |||
=== 2. Pindahkan ke direktori web === | === 2. Pindahkan ke direktori web === | ||
mv roundcubemail-1.6.2 /var/www/roundcube | |||
== Langkah 6: Konfigurasi Database == | == Langkah 6: Konfigurasi Database == | ||
| Baris 93: | Baris 94: | ||
=== 1. Buat database untuk Roundcube === | === 1. Buat database untuk Roundcube === | ||
mysql -e "CREATE DATABASE roundcube;" | |||
mysql -e "CREATE USER 'roundcube'@'localhost' IDENTIFIED BY 'password';" | |||
mysql -e "GRANT ALL PRIVILEGES ON roundcube.* TO 'roundcube'@'localhost';" | |||
mysql -e "FLUSH PRIVILEGES;" | |||
== Langkah 7: Konfigurasi Web Server == | == Langkah 7: Konfigurasi Web Server == | ||
| Baris 102: | Baris 103: | ||
=== 1. Buat konfigurasi Apache === | === 1. Buat konfigurasi Apache === | ||
nano /etc/apache2/sites-available/roundcube.conf | |||
=== 2. Tambahkan konfigurasi: === | === 2. Tambahkan konfigurasi: === | ||
| Baris 124: | Baris 125: | ||
</VirtualHost> | </VirtualHost> | ||
[[Berkas:004-apache-config-roundcube.png|pus|jmpl|566x566px]] | |||
=== 3. Aktifkan situs dan modul === | === 3. Aktifkan situs dan modul === | ||
a2ensite roundcube | |||
a2enmod rewrite | |||
systemctl restart apache2 | |||
== Langkah 8: Finishing Setup == | == Langkah 8: Finishing Setup == | ||
Revisi per 9 Desember 2024 01.53
Tujuan Pembelajaran
Setelah mempelajari modul ini, peserta didik diharapkan dapat:
- Memahami konsep dasar mail server
- Menginstal dan mengkonfigurasi mail server
- Mengintegrasikan Roundcube sebagai webmail
- Melakukan konfigurasi dasar keamanan
Prasyarat
- Sistem Operasi: Debian 12 (Bookworm)
- Hak akses: Root atau sudo
- Koneksi Internet
- Domain atau subdomain yang telah disiapkan
Perangkat Lunak yang Dibutuhkan
- Postfix (Mail Transfer Agent)
- Dovecot (IMAP/POP3 Server)
- Roundcube (Webmail Interface)
- Apache Web Server
- PHP
- MariaDB
Langkah Instalasi
Langkah 1: Update Sistem
apt update
apt upgrade -y
Langkah 2: Instalasi Paket Dasar
apt install -y postfix dovecot-core dovecot-imapd dovecot-pop3d \
apache2 mariadb-server php php-cli php-fpm php-json php-common \
php-mysql php-zip php-gd php-mbstring php-curl php-xml php-pear \
php-bcmath libapache2-mod-php
Langkah 3: Konfigurasi Postfix
1. Buka konfigurasi postfix
nano /etc/postfix/main.cf
2. Tambahkan/edit konfigurasi berikut:
myhostname = mail.example.com
mydestination = $myhostname, localhost.$mydomain, localhost
inet_interfaces = all
inet_protocols = all
home_mailbox = Maildir/
3. Restart layanan postfix
systemctl restart postfix
Langkah 4: Konfigurasi Dovecot
1. Edit konfigurasi dovecot
nano /etc/dovecot/dovecot.conf
2. Tambahkan/edit konfigurasi:
protocols = imap pop3
mail_location = maildir:~/Maildir
3. Restart layanan dovecot
systemctl restart dovecot
Langkah 5: Instalasi Roundcube
1. Download Roundcube
cd /tmp
wget https://github.com/roundcube/roundcubemail/releases/download/1.6.2/roundcubemail-1.6.2-complete.tar.gz
tar -xvzf roundcubemail-1.6.2-complete.tar.gz
2. Pindahkan ke direktori web
mv roundcubemail-1.6.2 /var/www/roundcube
Langkah 6: Konfigurasi Database
1. Buat database untuk Roundcube
mysql -e "CREATE DATABASE roundcube;"
mysql -e "CREATE USER 'roundcube'@'localhost' IDENTIFIED BY 'password';"
mysql -e "GRANT ALL PRIVILEGES ON roundcube.* TO 'roundcube'@'localhost';"
mysql -e "FLUSH PRIVILEGES;"
Langkah 7: Konfigurasi Web Server
1. Buat konfigurasi Apache
nano /etc/apache2/sites-available/roundcube.conf
2. Tambahkan konfigurasi:
apache
<VirtualHost *:80>
ServerName mail.example.com
DocumentRoot /var/www/roundcube
<Directory /var/www/roundcube>
Options FollowSymLinks
AllowOverride All
Require all granted
</Directory>
</VirtualHost>
3. Aktifkan situs dan modul
a2ensite roundcube
a2enmod rewrite
systemctl restart apache2
Langkah 8: Finishing Setup
- Akses Roundcube melalui browser
- Ikuti wizard instalasi
- Gunakan kredensial database yang telah dibuat
Keamanan Tambahan
- Aktifkan SSL/TLS
- Konfigurasi firewall
- Gunakan autentikasi dua faktor
Troubleshooting Umum
- Periksa log sistem: `/var/log/mail.log`
- Pastikan port 25, 143, 993 terbuka
- Cek izin direktori dan file
Evaluasi Praktikum
- Berhasil menginstal mail server
- Dapat login ke Roundcube
- Mampu mengirim dan menerima email
Referensi Lanjutan
- Dokumentasi Postfix
- Dokumentasi Dovecot
- Dokumentasi Roundcube


